Front Seat Refurbishment
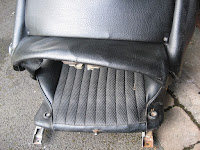
 43 years have taken their toll on the padding of the front seats. Whilst the structure/frame was sturdy and robust, the bolsters were non-existent and had collapsed. There was also evidence of rust to the rails and the seat frame. So, new fillers were purchased from Mr Rimmer and I started to open up the first seat to see what was inside......
 As there are no issues (other than dirt) with the vinyl covering, I carefully removed each of the many retaining clips that hold the fabric to the frame. What I found in there was disgusting. The foam had completely disintegrated in the bolsters and stank!!
 With the aid of rubber gloves and a razor blade, I parted the vinyl from the padding. Not easy, as the padding had been glued to the vinyl and was still firmly attached even after all of this time. It was also complicated by the need to disassemble the seat frames in order to remove the vinyl in a way that it could be re-used.
  I ended up with 3 pieces of frame: the runners, the seat base and the seat back. Each needed extensive cleaning and removal of surface rust before prepping and painting with black Hammerite.
Here is the seat back after painting and with the rubber strapping cleaned and replaced. Looks better already.

 Putting the new cushions back in place took longer than I had thought. It's not a difficult process if you reverse the dismantling process, but it's fiddly and made far more difficult for re-using the seat vinyl. The reason is that the seat vinyl is secured to the frame by beige strips of much less heavy duty vinyl - see photos.This can rip, especially when you start to tension the vinyl over the new cushions.I was quite pleased with the result though.The seat base is a single cushion so should be more straight forward, but oops I don't have them. After checking my order from Rimmers I found I didn't order properly. I only ordered the kit for the seat backs rather than the complete seat. So I received the 2 side bolsters, 2 seat back cushions and a cushion connecting the 2 bolsters that sits under the head rest - but no set base. Another order from Rimmers required.
 The drivers seat was much like the passenger one: the cushions had collapsed with age and usage, the frame and runners had rusted, and the whole thing was just tired. Unlike the passenger seat the seat base on the drivers seat did have a couple of nicks /splits in the vinyl. I didn't think they were sufficient to warrant the expense of a new vinyl (I've spent enough with Mr Rimmer lately) so I have patched it from the back with strong tape.
 Here's the end result - much improved.


Comments
Post a Comment